
Crib Bumper Window Cornices
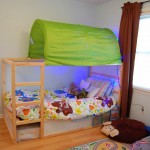
 When I was pregnant with Landon, we read all the warnings about crib bumpers. We decided we didn’t want to risk it and went bumperless. Once he was more mobile in the crib, we bought a breathable bumper and we were happy with that decision. Now along with all of this, we had the cute bedding set (which I got on clearance from Target the day I found out he was a boy). I loved the pattern for the simplistic design and ways I could replicate it around the room. Problem was, the majority of the print was on the bumper…that I wouldn’t use. Womp. So I set out to figure out something to do with them. I googled and googled (there was no Pinterest then) and finally found a random picture where someone had used their bumper as a window cornice. So Kevin whipped them up with a few pieces of plywood and I upholstered them with the bumper and a staple gun. It was so simple and I got to reuse a crib bumper that usually sees MAYBE 6 months of life anyway.
Since then, I have had questions about them from time to time and realized I should have made a tutorial for them. So when Dolphin’s arrival became pending, I thought I would look around for other ideas for crib bumpers. I mean Pinterest can make anything out of fucking paintchips, why not a crib bumper? But ya know what, there really wasn’t anything! So back to cornice boxes we went. So this time, you get a tutorial!
What You Will Need
Crib bumper with a little padding OR buy some quilt batting
Quater inch plywood
1×2 piece of wood (for bracing…nothing fancy)
Screws
L brackets (average window took 2 but eyeball you length)
Staple gun
Measuring tape
 Bumper Prep
- Pull out all the seams so you get a smooth solid panel. Mine had seams for where it would hit the crib corners. I slept with this fine gentleman to pop the seams out with a pocket knife. Totally worth it.
- Cut the backside fabric down the middle.
- Cut the entire bumper to the length of the window box plus a little to wrap around the ends.
 Cornice Box Construction
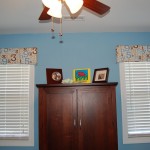
- Measure windows and decide how long you want the boxes. Ours were right around the frame at about 37.5 inches.
- Measure the height of the bumper. Our’s was 10 inches.
- Cut plywood to include, front, 2 sides* and top (will block out the light from above for your baby crypt). Make the sides as deep as you want. All up to you.
- Cut 1×2 pieces into small little braces pieces. Kevin said he didn’t really measure…couple of inches for internal support and anchoring.
- Make a box. Use the 1×2 pieces to screw into around the sides and screw everything together. You don’t have to be pretty about it. It is all covered.
 Upholstery
- Wrap bumper over box.
- Use staple gun to pull tight and secure. I found it was good to have 2 sets of hands here. One to hold and one to staple.

Installation
- Place boxes over windows and find placement for L brackets for support ( note: in our case of the wall, we put the second L on the other wall).
- Mark the place for them.
- Screw L brackets into the wall.
- Place box over L brackets.
- Screw box on to L brackets. (In Dolphin’s room, we just did small nails. Just enough to make sure the boxes won’t fall).
VOILA!

Now you can leave this way OR you can do what we do and buy cheap tension rods and put up black out curtains in the boxes. I got 2 tension rods for less than $20 at Target and I didn’t shop around. Got my curtains at Big Lots for $10 a panel. WOOT!
See! Easy. This is from someone with no sewing machine. I don’t even know if I could find a needle in this house. No kidding. So ANYONE can do this. Promise.


That is pretty freakin genius. Great job! We get our bedding in on Monday! So excited!
Wonderful idea!
What a great idea!! I felt the same way about crib bumpers that you do. However, I found the Wonder Bumpers and realized that they provide all the protection without the risks that come along with the traditional bumpers. You should look into them… I am so happy with my set!!
This is awesome, I love the idea of tension rods on the inside for blackouts – so easy and inexpensive. Thanks lady : )
Pingback:Things I Love – Craft A Day
Small and not too heavy, this tool includes more or less
everything you will need when on a camping, hiking or fishing trip.
A definite method encrusted with solid cap and aluminium covering.
Pocket Knives are the most valuable and versatile tools, that help you to do certain jobs from opening boxes,
letters, packages, and even you can use it for self defense.